Installation and getting started
To install PySPH, you need a working Python environment with the required dependencies installed. You may use any of the available Python distributions. PySPH is currently tested with Python 3.x. If you are new to Python we recommend EDM or Anaconda. PySPH will work fine with miniconda, Anaconda or other environments like WinPython. The following instructions should help you get started.
Since there is a lot of information here, we suggest that you skim the section on Quick installation, Dependencies and then directly jump to one of the “Installing the dependencies on xxx” sections below depending on your operating system. If you need to use MPI please do go through Installation with MPI first though.
Depending on your chosen Python distribution, simply follow the instructions and links referred therein.
- Quick installation
- Installation with MPI
- Using the configuration file
- Dependencies
- Installing the dependencies on GNU/Linux
- Installing the dependencies on Ubuntu 18.04
- Installing the dependencies on Mac OS X
- Installing the dependencies on Windows
- Using a virtualenv for PySPH
- Downloading PySPH
- Building and Installing PySPH
- Issues with the pip cache
- Running the tests
- Running the examples
- Possible issues with the viewer
Quick installation
If you are reasonably experienced with installing Python packages, already have a C++ compiler setup on your machine, and are not immediately interested in running PySPH on multiple CPUs (using MPI), then installing PySPH is simple. Simply running pip like so:
$ pip install PySPH
should do the trick. You may do this in a virtualenv if you chose to. The important examples are packaged with the sources, you should be able to run those immediately. If you wish to download the sources and explore them, you can download the sources either using the tarball/ZIP or from git, see Downloading PySPH. If you need MPI support you should first read Installation with MPI.
The above will install the latest released version of PySPH, you can install the development version using:
$ pip install https://github.com/pypr/pysph/zipball/master
If you wish to track the development of the package, clone the repository (as described in Downloading PySPH and do the following:
$ pip install -r requirements.txt
$ python setup.py develop
The following instructions are more detailed and also show how optional dependencies can be installed. Instructions on how to set things up on Windows is also available below.
If you are running into strange issues when you are setting up an installation with ZOLTAN, see here, Issues with the pip cache.
Installation with MPI
These are the big picture instructions for installation with MPI. This can be tricky since MPI is often very tuned to the specific hardware you are using. For example on large HPC clusters, different flavors of highly optimized MPI libraries are made available. These require different compilation and link flags and often different compilers are available as well.
In addition to this, the Python package installer pip tries to build wheels in an isolated environment by default. This is a problem when installing packages which use libraries like MPI. Our recommendations and notes here are so you understand what is going on.
The first thing you will need to do is install mpi4py and test that it works
well. Read the documentation so your mpi4py is suitably configured for your
hardware and works correctly. You will then need to install PyZoltan which
requires that the Zoltan library be installed. The installation instructions
are available in the PyZoltan documentation but you must ensure that you either
install it from source using python setup.py install or python setup.py
develop or if you install it with pip you can do this:
pip install pyzoltan --no-build-isolation
This shuts of pip’s default build isolation so it picks up your installed version of mpi4py. Once this is installed you can install pysph using:
pip install pysph --no-build-isolation
Basically, if you use pip with MPI support you will need to turn off its
default build isolation. OTOH, you do not need to do anything special if you
install using python setup.py install.
Finally, given that custom MPI environments require custom compile/link flags you may find it worthwhile using a configuration file to set these up for both PyZoltan and PySPH as discussed in Using the configuration file.
Using the configuration file
Instead of setting environment variables and build options on the shell you can have them setup using a simple configuration file. This is the same as that described in the PyZoltan documentation and is entirely optional but if you are customizing your builds for MPI, this may be very useful.
The file is located in ~/.compyle/config.py (we use the same file for
compyle and PyZoltan). Here ~ is your home directory which on Linux is
/home/username, on MacOS /Users/username and on Windows the location
is likely \Users\username. This file is executed and certain options may
be set there.
For example if you wish to set the appropriate C and C++ compiler (icc, Cray,
or PGI), you may set the CC and CXX environment variables. You could
do this in the ~/.compyle/config.py:
import os

os.environ['CC'] = 'cc'
os.environ['CXX'] = 'CC'
The above are for a Cray system. You may also setup custom OpenMP related flags. For example, on a Cray system you may do the following:
OMP_CFLAGS = ['-homp']
OMP_LINK = ['-homp']
The OMP_CFLAGS and OMP_LINK parameters should be lists.
The MPI and ZOLTAN specific options are:
MPI_CFLAGS = ['...']  # must be a list.
MPI_LINK = ['...']

# Zoltan options
USE_TRILINOS = 1  # When set to anything, use "-ltrilinos_zoltan".
ZOLTAN = '/path/to_zoltan'  # looks inside this for $ZOLTAN/include/, lib/

# Not needed if using ZOLTAN
ZOLTAN_INCLUDE = 'path/include'  # path to zoltan.h
ZOLTAN_LIBRARY = 'path/lib'  # path to libzoltan.a
Note that the above just lists all the different options. You do not need to set them all, only use those that you need, if the defaults work for you.
Dependencies
Core dependencies
The core dependencies are:
The project’s requirements.txt lists all the required core dependencies.
These packages can be installed from your Python distribution’s package manager, or using pip. For more detailed instructions on how to do this for different distributions, see below.
Running PySPH requires a working C/C++ compiler on your machine. On Linux/OS X the gcc toolchain will work well. On Windows, you will need to have a suitable MSVC compiler installed, see https://wiki.python.org/moin/WindowsCompilers for specific details.
On Python 2.7 for example, you will need Microsoft Visual C++ Compiler for Python 2.7 or an equivalent compiler. More details are available below.
Note
PySPH generates high-performance code and compiles it on the fly. This requires a working C/C++ compiler even after installing PySPH.
Optional dependencies
The optional dependencies are:
- OpenMP: PySPH can use OpenMP if it is available. Installation instructions are available below.
- PyOpenCL: PySPH can use OpenCL if it is available. This requires installing PyOpenCL.
- PyCUDA: PySPH can use CUDA if it is available. This requires installing PyCUDA.
- Mayavi: PySPH provides a convenient viewer to visualize the output of simulations. This viewer can be launched using the command
pysph viewand requires Mayavi to be installed. Since this is only a viewer it is optional for use, however, it is highly recommended that you have it installed as the viewer is very convenient.- mpi4py and Zoltan_: If you want to use PySPH in parallel, you will need mpi4py and the Zoltan_ data management library along with the PyZoltan package. PySPH will work in serial without mpi4py or Zoltan_. Simple build instructions for Zoltan are included below but please do go through the Installation with MPI section to get an overview.
Mayavi is packaged with all the major distributions and is easy to install. Zoltan_ is very unlikely to be already packaged and will need to be compiled.
Building and linking PyZoltan on OSX/Linux
If you want to use PySPH in parallel you will need to install PyZoltan. PyZoltan requires the Zoltan library to be available. We’ve provided a simple Zoltan build script in the PyZoltan repository. This works on Linux and OS X but not on Windows. It can be used as:
$ ./build_zoltan.sh $INSTALL_PREFIX
where the $INSTALL_PREFIX is where the library and includes will be
installed (remember, this script is in the PyZoltan repository and not in
PySPH). You may edit and tweak the build to suit your installation. However,
this script is what we use to build Zoltan on our continuous integration
servers on Travis-CI and Shippable.
After Zoltan is build, set the environment variable ZOLTAN to point to the
$INSTALL_PREFIX that you used above:
$ export ZOLTAN=$INSTALL_PREFIX
Note that replace $INSTALL_PREFIX with the directory you specified above.
After this, follow the instructions to build PyZoltan. The PyZoltan wrappers
will be compiled and available.
Now, when you build PySPH, it too needs to know where to link to Zoltan and
you should keep the ZOLTAN environment variable set. This is only needed
until PySPH is compiled, thereafter we do not need the environment variable.
If you are running into strange issues when you are setting up pysph with ZOLTAN, see here, Issues with the pip cache.
Note
The installation will use $ZOLTAN/include and $ZOLTAN/lib to find
the actual directories, if these do not work for your particular
installation for whatever reason, set the environment variables
ZOLTAN_INCLUDE and ZOLTAN_LIBRARY explicitly without setting up
ZOLTAN. If you used the above script, this would be:
$ export ZOLTAN_INCLUDE=$INSTALL_PREFIX/include
$ export ZOLTAN_LIBRARY=$INSTALL_PREFIX/lib
If Zoltan can be installed through your distro’s package manager or using alternate tools, it is not mandatory to use the provided zoltan build script.
For example, if you are on Arch or an Arch-based distro, this can be accomplished using zoltan or trilinos from AUR. Then, the environment variables should set as:
$ export ZOLTAN_INCLUDE=/usr/include
$ export ZOLTAN_LIBRARY=/usr/lib
Similarly, for Ubuntu, see Installing the dependencies on Ubuntu 18.04.
By the way, you may also set these in the configuration file described in Using the configuration file.
Installing the dependencies on GNU/Linux
If you are using EDM or Anaconda the instructions in the section Installing the dependencies on Mac OS X will be useful as the instructions are the same. The following are for the case where you wish to use the native Python packages distributed with the Linux distribution you are using.
If you are running into trouble, note that it is very easy to install using EDM (see Using EDM) or conda (see Using Anaconda) and you may make your lives easier going that route.
GNU/Linux is probably the easiest platform to install PySPH. On Ubuntu one may install the dependencies using:
$ sudo apt-get install build-essential python-dev python-numpy \
    python-mako cython python-pytest mayavi2 python-qt4 python-virtualenv
OpenMP is typically available but if it is not, it can be installed with:
$ sudo apt-get install libomp-dev
If you need parallel support:
$ sudo apt-get install libopenmpi-dev python-mpi4py
$ ./build_zoltan.sh ~/zoltan # Replace ~/zoltan with what you want
$ export ZOLTAN=~/zoltan
On Linux it is probably best to install PySPH into its own virtual environment. This will allow you to install PySPH as a user without any superuser priviledges. See the section below on Using a virtualenv for PySPH. In short do the following:
$ virtualenv --system-site-packages pysph_env
$ source pysph_env/bin/activate
$ pip install cython --upgrade # if you have an old version.
If you wish to use a compiler which is not currently your default compiler,
simply update the CC and CXX environment variables. For example, to use
icc run the following commands before building PySPH:
$ export CC=icc
$ export CXX=icpc
Note
In this case, you will additionally have to ensure that the relevant intel
shared libraries can be found when running PySPH code. Most intel
installations come along with shell scripts that load relevant environment
variables with the right values automatically. This shell script is
generally named compilervars.sh and can be found in
/path/to/icc/bin. If you didn’t get this file along with your
installation, you can try running export
LD_LIBRARY_PATH=/path/to/icc/lib.
Note that you may also set the configuration options in the configuration file described in Using the configuration file.
You should be set now and should skip to Downloading PySPH and Building and Installing PySPH.
On recent versions of Ubuntu (16.10 and 18.04) there may be problems with
Mayavi viewer, and pysph view may not work correctly. To see how to
resolve these, please look at Possible issues with the viewer.
Note
If you wish to see a working build/test script please see our shippable.yml.
Installing the dependencies on Ubuntu 18.04
On Ubuntu 18.04 it should be relatively simple to install PySPH with ZOLTAN as follows:
# For OpenMP
$ sudo apt-get install libomp-dev

# For Zoltan
$ sudo apt-get install openmpi-bin libopenmpi-dev libtrilinos-zoltan-dev

$ export ZOLTAN_INCLUDE=/usr/include/trilinos
$ export ZOLTAN_LIBRARY=/usr/lib/x86_64-linux-gnu
$ export USE_TRILINOS=1
You may also set these options in the configuration file described in Using the configuration file.
Now depending on your setup you can install the Python related dependencies. For example with conda you can do:
$ conda install -c conda-forge cython mako matplotlib jupyter pyside pytest \
                   mock meshio pytools

$ conda install -c conda-forge mpi4py
Then you should be able to install pyzoltan and its dependency cyarray using:
$ pip install pyzoltan --no-build-isolation
Finally, install PySPH with
$ pip install pysph --no-build-isolation
Or with:
$ pip install --no-cache-dir --no-build-isolation pysph
If you are having trouble due to pip’s cache as discussed in Issues with the pip cache.
You should be all set now and should next consider Running the tests.
Note
The --no-build-isolation argument to pip is necessary for without
it, pip will attempt to create an isolated environment and build a pyzoltan
wheel inside that isolated environment. This will mean that it will not see
mpi4py that you have built and installed. This could end up causing all
sorts of problems especially if you have a custom MPI library.
Installing the dependencies on Mac OS X
On OS X, your best bet is to install EDM, or Anaconda or some other Python distribution. Ensure that you have gcc or clang installed by installing XCode. See this if you installed XCode but can’t find clang or gcc.
If you are getting strange errors of the form:
lang: warning: libstdc++ is deprecated; move to libc++ with a minimum deployment target of OS X 10.9 [-Wdeprecated]
ld: library not found for -lstdc++
clang: error: linker command failed with exit code 1 (use -v to see invocation)
Then try this (on a bash shell):
$ export MACOSX_DEPLOYMENT_TARGET=10.9
And run your command again (replace the above with a suitable line on other
shells). This is necessary because your Python was compiled with an older
deployment target and the current version of XCode that you have installed is
not compatible with that. By setting the environment variable you allow
compyle to use a newer version. If this works, it is a good idea to set this
in your default environment (.bashrc for bash shells) so you do not have
to do this every time.
OpenMP on OSX
The default clang compiler available on MacOS uses an LLVM backend and does not support OpenMP. There are two ways to support OpenMP. The first involves installing the OpenMP support for clang. This can be done with brew using:
$ brew install libomp
Once that is done, it should “just work”. If you get strange errors, try
setting the MACOSX_DEPLOYMENT_TARGET as shown above.
Another option is to install GCC for MacOS available on brew using
$ brew install gcc
Once this is done, you need to use this as your default compiler. The gcc
formula on brew currently ships with gcc version 9. Therefore, you can
tell Python to use the GCC installed by brew by setting:
$ export CC=gcc-9
$ export CXX=g++-9
Note that you still do need to have the command-line-tools for XCode
installed, otherwise the important header files are not available. See
how-to-install-xcode-command-line-tools
for more details. You may also want to set these environment variables in your
.bashrc so you don’t have to do this every time.
Once you do this, compyle will automatically use this version of GCC and will also work with OpenMP. Note that on some preliminary benchmarks, GCC’s OpenMP implementation seems about 10% or so faster than the LLVM version. Your mileage may vary.
Using EDM
It is very easy to install all the dependencies with the Enthought Deployment Manager (EDM).
Download the EDM installer if you do not already have it installed. Install the appropriate installer package for your system.
Once you have installed EDM, run the following:
$ edm install mayavi pyside cython matplotlib jupyter pytest mock pip
$ edm shell
$ pip install mako
With this done, you should be able to install PySPH relatively easily, see Building and Installing PySPH.
Using Anaconda
After installing Anaconda or miniconda, you will need to make sure the dependencies are installed. You can create a separate environment as follows:
$ conda create -n pysph_env
$ source activate pysph_env
Now you can install the necessary packages:
$ conda install -c conda-forge cython mako matplotlib jupyter pyside pytest mock
$ conda install -c menpo mayavi
If you need parallel support, please see Installing mpi4py and Zoltan on OS X, otherwise, skip to Downloading PySPH and Building and Installing PySPH.
Installing mpi4py and Zoltan on OS X
In order to build/install mpi4py one first has to install the MPI library.
This is easily done with Homebrew as follows (you need to have brew
installed for this but that is relatively easy to do):
$ sudo brew install open-mpi
After this is done, one can install mpi4py by hand. First download mpi4py from here. Then run the following (modify these to suit your XCode installation and version of mpi4py):
$ cd /tmp
$ tar xvzf ~/Downloads/mpi4py-1.3.1.tar.gz
$ cd mpi4py-1.3.1
$ export MACOSX_DEPLOYMENT_TARGET=10.7
$ export SDKROOT=/Applications/Xcode.app/Contents/Developer/Platforms/MacOSX.platform/Developer/SDKs/MacOSX10.7.sdk/
$ python setup.py install
Change the above environment variables to suite your SDK version. If this installs correctly, mpi4py should be available.
You can then follow the instructions on how to build/install Zoltan and
PyZoltan given above. You should be set now and should move to
Building and Installing PySPH. Just make sure you have set the ZOLTAN environment
variable so PySPH knows where to find it.
Installing the dependencies on Windows
While it should be possible to use mpi4py and Zoltan on Windows, we do not at this point have much experience with this. Feel free to experiment and let us know if you’d like to share your instructions. The following instructions are all without parallel support.
Using EDM
It is very easy to install all the dependencies with the Enthought Deployment Manager (EDM).
Download the EDM installer if you do not already have it installed. Install the appropriate installer package for your system.
Once you have installed EDM, run the following:
> edm install mayavi pyside cython matplotlib jupyter pytest mock pip
> edm shell
> pip install mako
Once you are done with this, please skip ahead to Installing Visual C++ Compiler for Python.
Using WinPython
Instead of Anaconda you could try WinPython 2.7.x.x. To obtain the core dependencies, download the corresponding binaries from Christoph Gohlke’s Unofficial Windows Binaries for Python Extension Packages. Mayavi is available through the binary ETS.
You can now add these binaries to your WinPython installation by going to WinPython Control Panel. The option to add packages is available under the section Install/upgrade packages.
Make sure to set your system PATH variable pointing to the location of the
scripts as required. If you have installed WinPython 2.7.6 64-bit, make sure
to set your system PATH variables to <path to installation
folder>/python-2.7.6.amd64 and <path to installation
folder>/python-2.7.6.amd64/Scripts/.
Once you are done with this, please skip ahead to Installing Visual C++ Compiler for Python.
Using Anaconda
Install Anaconda for your platform, make it the default and then install the required dependencies:
$ conda install cython mayavi
$ pip install mako
Once you are done with this, please skip ahead to Installing Visual C++ Compiler for Python.
Installing Visual C++ Compiler for Python
For all of the above Python distributions, it is highly recommended that you build PySPH with Microsoft’s Visual C++ for Python. See see https://wiki.python.org/moin/WindowsCompilers for specific details for each version of Python. Note that different Python versions may have different compiler requirements.
On Python 3.6 and above you should use Microsoft’s Build Tools for Visual Studio 2017.
On Python 2.7 for example use Microsoft’s Visual C++ for Python 2.7. We
recommend that you download and install the VCForPython27.msi available
from the link. Make sure
you install the system requirements specified on that page. For example, you
will need to install the Microsoft Visual C++ 2008 SP1 Redistributable Package
for your platform (x86 for 32 bit or x64 for 64 bit) and on Windows 8 and
above you will need to install the .NET framework 3.5. Please look at the link
given above, it should be fairly straightforward. Note that doing this will
also get OpenMP working for you.
After you do this, you will find a “Microsoft Visual C++ Compiler Package for Python” in your Start menu. Choose a suitable command prompt from this menu for your architecture and start it (we will call this the MSVC command prompt). You may make a short cut to it as you will need to use this command prompt to build PySPH and also run any of the examples.
After this is done, see section Downloading PySPH and get a copy of PySPH. Thereafter, you may follow section Building and Installing PySPH.
Warning
On 64 bit Windows, do not build PySPH with mingw64 as it does not work reliably at all and frequently crashes. YMMV with mingw32 but it is safer and just as easy to use the MS VC++ compiler.
Using a virtualenv for PySPH
A virtualenv allows you to create an isolated environment for PySPH and its related packages. This is useful in a variety of situations.
- Your OS does not provide a recent enough Cython version (say you are running Debian stable).
- You do not have root access to install any packages PySPH requires.
- You do not want to mess up your system files and wish to localize any installations inside directories you control.
- You wish to use other packages with conflicting requirements.
- You want PySPH and its related packages to be in an “isolated” environment.
You can either install virtualenv (or ask your system administrator to) or
just download the virtualenv.py script and use
it (run python virtualenv.py after you download the script).
Create a virtualenv like so:
$ virtualenv --system-site-packages pysph_env
This creates a directory called pysph_env which contains all the relevant
files for your virtualenv, this includes any new packages you wish to install
into it. You can delete this directory if you don’t want it anymore for some
reason. This virtualenv will also “inherit” packages from your system. Hence
if your system administrator already installed NumPy it may be imported from
your virtual environment and you do not need to install it. This is
very useful for large packages like Mayavi, Qt etc.
Note
If your version of virtualenv does not support the
--system-site-packages option, please use the virtualenv.py script
mentioned above.
Once you create a virtualenv you can activate it as follows (on a bash shell):
$ source pysph_env/bin/activate
On Windows you run a bat file as follows:
$ pysph_env/bin/activate
This sets up the PATH to point to your virtualenv’s Python. You may now run any normal Python commands and it will use your virtualenv’s Python. For example you can do the following:
$ virtualenv myenv
$ source myenv/bin/activate
(myenv) $ pip install Cython mako pytest
(myenv) $ cd pysph
(myenv) $ python setup.py install
Now PySPH will be installed into myenv. You may deactivate your
virtualenv using the deactivate command:
(myenv) $ deactivate
$
On Windows, use myenv\Scripts\activate.bat and
myenv\Scripts\deactivate.bat.
If for whatever reason you wish to delete myenv just remove the entire
directory:
$ rm -rf myenv
Note
With a virtualenv, one should be careful while running things like
ipython or pytest as these are sometimes also installed on the
system in /usr/bin. If you suspect that you are not running the
correct Python, you could simply run (on Linux/OS X):
$ python `which ipython`
to be absolutely sure.
Downloading PySPH
One way to install PySPH is to use pip
$ pip install PySPH
This will install PySPH, and you should be able to import it and use the modules with your Python scripts that use PySPH. This will also provide the standard set of PySPH examples. If you want to take a look at the PySPH sources you can get it from git or download a tarball or ZIP as described below.
To get PySPH using git type the following
$ git clone https://github.com/pypr/pysph.git
If you do not have git or do not wish to bother with it, you can get a ZIP or tarball from the pysph site. You can unzip/untar this and use the sources.
In the instructions, we assume that you have the pysph sources in the
directory pysph and are inside the root of this directory. For example:
$ unzip pysph-pysph-*.zip
$ cd pysph-pysph-1ce*
or if you cloned the repository:
$ git clone https://github.com/pypr/pysph.git
$ cd pysph
Once you have downloaded PySPH you should be ready to build and install it, see Building and Installing PySPH.
Building and Installing PySPH
Once you have the dependencies installed you can install PySPH with:
$ pip install PySPH
If you are going to be using PySPH with MPI support you will likely need to do:
$ pip install PySPH --no-build-isolation
You can install the development version using:
$ pip install https://github.com/pypr/pysph/zipball/master
If you downloaded PySPH using git or used a tarball you can do:
$ python setup.py install
You could also do:
$ python setup.py develop
This is useful if you are tracking the latest version of PySPH via git. With git you can update the sources and rebuild using:
$ git pull
$ python setup.py develop
You should be all set now and should next consider Running the tests.
Issues with the pip cache
Note that pip caches any packages it has built and installed earlier. So if you installed PySPH without Zoltan support, say and then uninstalled PySPH using:
$ pip uninstall pysph
then if you try a pip install pysph again (and the PySPH version has not
changed), pip will simply re-use the old build it made. You do not want this
and want it to re-build PySPH to use ZOLTAN say, then you can do the
following:
$ pip install --no-cache-dir --no-build-isolation pysph
In this case, pip will disregard its default cache and freshly download and build PySPH. This is often handy.
Running the tests
Once you install PySPH you can run the tests using the pysph script
that is installed:
$ pysph test
If you see errors while running the tests, you might want more verbose reporting which you can get with:
$ pysph test -v
This should run all the tests that do not take a long while to complete. If this fails, please contact the pysph-users mailing list or send us email.
There are a few additional test dependencies that need to be installed when running the tests. These can be installed using:
$ pip install -r requirements-test.txt
Once you run the tests, you should see the section on Running the examples.
Note
Internally, we use the pytest package to run the tests.
For more information on what you can do with the pysph script try
this:
$ pysph -h
Running the examples
You can verify the installation by exploring some examples. The examples are
actually installed along with the PySPH library in the pysph.examples
package. You can list and choose the examples to run by doing:
$ pysph run
This will list all the available examples and allow you to run any of them. If
you wish to run a particular one, like say elliptical_drop, you may do:
$ pysph run elliptical_drop
This can also be run as:
$ pysph run pysph.examples.elliptical_drop
To see the options available, try this:
$ pysph run elliptical_drop -h
Note
Technically you can run the examples using python -m
pysph.examples.elliptical_drop. The pysph run command is a
lot more convenient as it allows a much shorter command
You can view the data generated by the simulation (after the simulation
is complete or during the simulation) by running pysph view command.
To view the simulated data you may do:
$ pysph view elliptical_drop_output
If you have Mayavi installed this should show a UI that looks like:
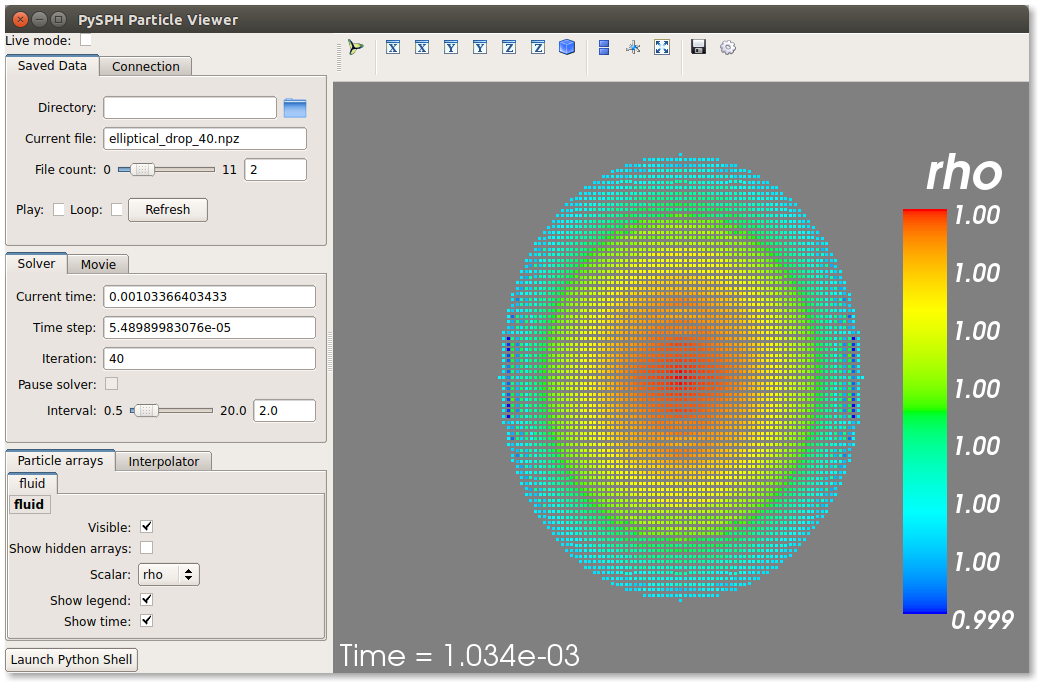
If the viewer does not start, you may want to see Possible issues with the viewer.
There are other examples that use the transport velocity formulation:
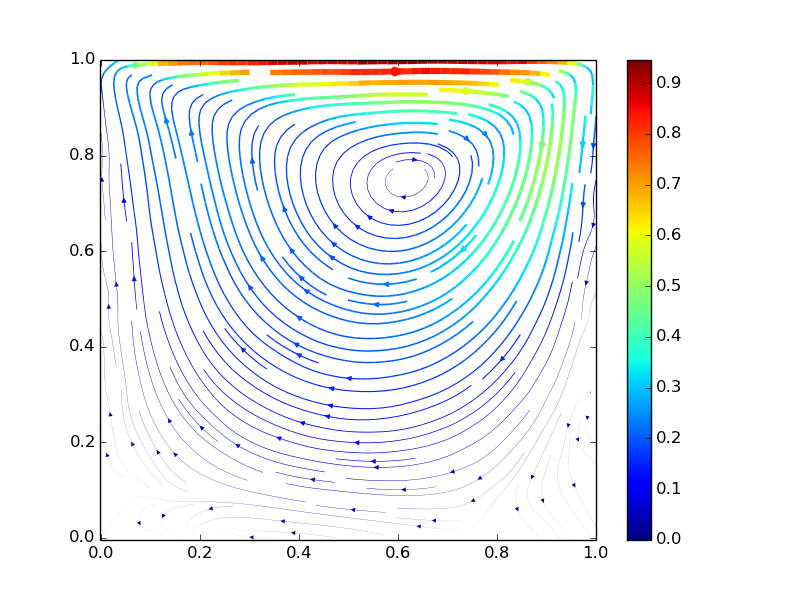
$ pysph run cavity
This runs the driven cavity problem using the transport velocity formulation
of Adami et al. The example also performs post-processing of the results and
the cavity_output will contain a few PNG images with these. You may view
these results using pysph view cavity_output.
For example for
example the file streamlines.png may look like what is shown below:
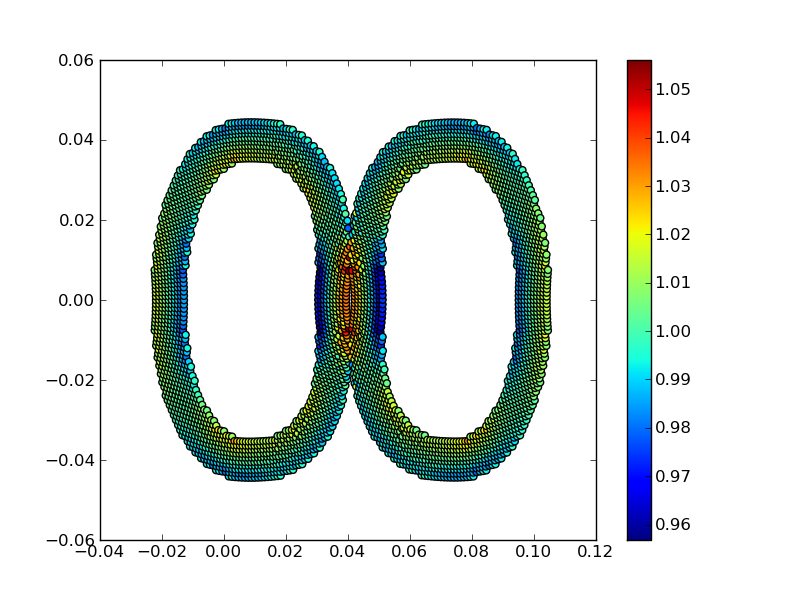
If you want to use PySPH for elastic dynamics, you can try some of the examples from Gray et al., Comput. Methods Appl. Mech. Engrg. 190 (2001), 6641-6662:
$ pysph run solid_mech.rings
Which runs the problem of the collision of two elastic rings. View the results like so:
$ pysph view rings_output
This should produce something that may look like the image below.
The auto-generated high-performance code for the example resides in the
directory ~/.pysph/source. A note of caution however, it’s not for the
faint hearted.
Running the examples with OpenMP
If you have OpenMP available run any of the examples as follows:
$ pysph run elliptical_drop --openmp
This should run faster if you have multiple cores on your machine. If you wish to change the number of threads to run simultaneously, you can try the following:
$ OMP_NUM_THREADS=8 pysph run elliptical_drop --openmp
You may need to set the number of threads to about 4 times the number of physical cores on your machine to obtain the most scale-up. If you wish to time the actual scale up of the code with and without OpenMP you may want to disable any output (which will be serial), you can do this like:
$ pysph run elliptical_drop --disable-output --openmp
Note that one may run example scripts directly with Python but this
requires access to the location of the script. For example, if a script
pysph_script.py exists one can run it as:
$ python pysph_script.py
The pysph run command is just a convenient way to run the
pre-installed examples that ship with PySPH.
Running the examples with OpenCL
If you have PyOpenCL installed and working with an appropriate device setup, then you can transparently use OpenCL as well with PySPH. This feature is very new and still fairly experimental. You may run into issues but using it is simple. You may run any of the supported examples as follows:
$ pysph run elliptical_drop --opencl
Yes, thats it, just use the --opencl option and code will be
auto-generated and run for you. By default it uses single-precision but you
can also run the code with double precision using:
$ pysph run elliptical_drop --opencl --use-double
Currently inlets and outlets are not supported, periodicity is slow and many optimizations still need to be made but this is rapidly improving. If you want to see an example that runs pretty fast, try the cube example:
$ pysph run cube --disable-output --np 1e6 --opencl
You may compare the execution time with that of OpenMP.
Running the examples with MPI
If you compiled PySPH with Zoltan_ and have mpi4py installed you may run any
of the examples with MPI as follows (here we choose 4 processors with
--np 4, change this to suit your needs):
$ mpirun -np 4 pysph run dam_break_3d
This may not give you significant speedup if the problem is too small. You can also combine OpenMP and MPI if you wish. You should take care to setup the MPI host information suitably to utilize the processors effectively.
Note
Note that again we are using pysph run here but for any other
scripts, one could do mpirun -np python some_script.py
Possible issues with the viewer
Often users are able to install PySPH and run the examples but are unable to
run pysph view for a variety of reasons. This section discusses how these
could be resolved.
The PySPH viewer uses Mayavi. Mayavi can be installed via pip. Mayavi depends on VTK which can also be installed via pip if your package manager does not have a suitable version.
If you are using Ubuntu 16.04 or 16.10 or a VTK version built with Qt5, it is possible that you will see a strange segmentation fault when starting the viewer. This is because Mayavi uses Qt4 and the VTK build has linked to Qt5. In these cases it may be best to use to use the latest VTK wheels that are now available on pypi. If you have VTK installed but you want a more recent version of Mayavi, you can always use pip to install Mayavi.
For the very specific case of Mayavi on Ubuntu 16.04 and its derivatives, you can use Ubuntu’s older VTK package like so:
$ sudo apt remove mayavi2 python-vtk6
$ sudo apt install python-vtk
$ pip install mayavi
What this does is to remove the system Mayavi and the VTK-6.x package which is linked to Qt5 and instead install the older python-vtk package. Then using pip to install Mayavi against this version of VTK. If the problem persists remember that by default pip caches any previous installations of Mayavi and you may need to install Mayavi like this:
$ pip --no-cache-dir install mayavi
If you are using EDM or Anaconda, things should work most of the time. However, there may be problems and in this case please report the issues to the pysph-users mailing list or send us email.